General examples
Contents
General examples#
TensorWaves is a package for fitting general mathematical expressions to data distributions. It has three main ingredients:
Express mathematical expressions in terms of different computational backends.
Generate and/or transform data distributions with those mathematical expressions.
Optimize parameters in a model with regard to a data distribution.
Overview#
Optimize parameters#
The most important feature of TensorWaves are the optimizer and estimator modules. These can be used to optimize the parameters in a ParametrizedFunction to a data distribution. Here is a one-dimensional example for a normal distribution!
import numpy as np

rng = np.random.default_rng(seed=0)
data = {
    "x": rng.normal(loc=25, scale=5, size=1_000),
}
The normal distribution can probably be described with a Gaussian function:
import sympy as sp

x, n, mu, sigma = sp.symbols("x n mu sigma")
expression = n * sp.exp(-((x - mu) ** 2) / (2 * sigma**2))
expression
TensorWaves can express this mathematical expression as a computation function in different kinds of backends, so that we can perform fast computations on large data samples. Here, we identify some of the Symbols in the expression as parameters and create a ParametrizedFunction, so that we can ‘fit’ the function to the generated distribution.
from tensorwaves.function.sympy import create_parametrized_function

function = create_parametrized_function(
    expression,
    parameters={n: 30, mu: 15, sigma: 11},
    backend="jax",
)
initial_parameters = function.parameters
Show code cell source
import matplotlib.pyplot as plt

fig, ax = plt.subplots(figsize=(5, 3))
fig.canvas.toolbar_visible = False
fig.canvas.header_visible = False
fig.canvas.footer_visible = False
ax.set_title("First parameter guess")
ax.set_xlabel("$x$")
ax.set_yticks([])
bin_values, bin_edges, _ = ax.hist(data["x"], bins=50, alpha=0.7, label="data")
x_values = (bin_edges[1:] + bin_edges[:-1]) / 2
y_values = bin_values
function.update_parameters(initial_parameters)
lines = ax.plot(
    x_values, function({"x": x_values}), c="red", linewidth=2, label="model"
)
ax.legend(loc="upper right")
plt.show()

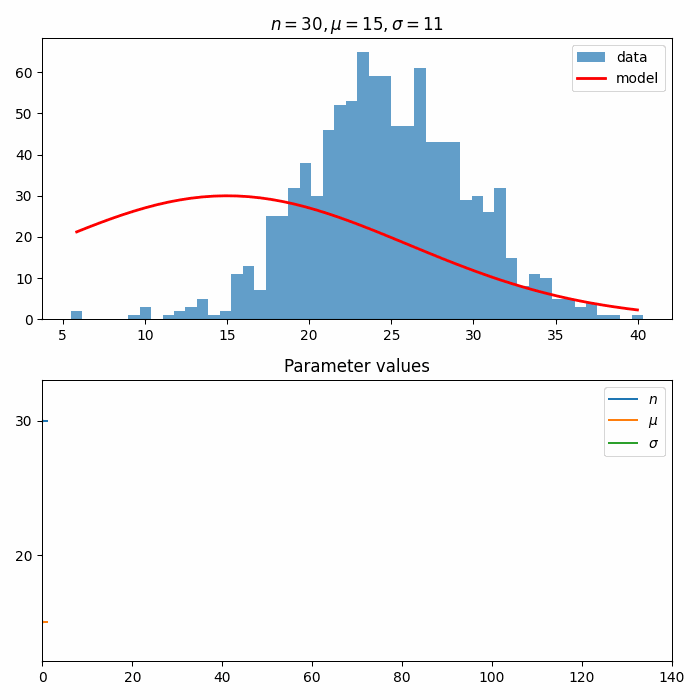
Next, we construct an Estimator and an Optimizer. These are used to optimize() the ParametrizedFunction to the data distribution.
Tip
callbacks allow inserting custom behavior into the Optimizer. Here, we create a custom callback to create an animation of the fit!
Show code cell content
%matplotlib widget
import matplotlib.pyplot as plt
from matplotlib.animation import PillowWriter

from tensorwaves.optimizer.callbacks import Callback

plt.ioff()


class FitAnimation(Callback):
    def __init__(
        self, data, function, x_values, output_file, estimated_iterations=140
    ):
        self.__function = function
        self.__fig, (self.__ax1, self.__ax2) = plt.subplots(
            nrows=2, figsize=(7, 7), tight_layout=True
        )
        self.__ax2.set_yticks(np.arange(-30, 80, 10))
        self.__ax1.hist(data["x"], bins=50, alpha=0.7, label="data")
        self.__line = self.__ax1.plot(
            x_values,
            function({"x": x_values}),
            c="red",
            linewidth=2,
            label="model",
        )[0]
        self.__ax1.legend(loc="upper right")

        self.__par_lines = [
            self.__ax2.plot(0, value, label=par)[0]
            for par, value in function.parameters.items()
        ]
        self.__ax2.set_xlim(0, estimated_iterations)
        self.__ax2.set_title("Parameter values")
        self.__ax2.legend(
            [
                f"${sp.latex(sp.Symbol(par_name))}$"
                for par_name in function.parameters
            ],
            loc="upper right",
        )

        self.__writer = PillowWriter(fps=15)
        self.__writer.setup(self.__fig, outfile=output_file)

    def on_optimize_start(self, logs):
        self._update_plot()

    def on_optimize_end(self, logs):
        self._update_plot()
        self.__writer.finish()

    def on_iteration_end(self, iteration, logs):
        self._update_plot()
        self.__writer.finish()

    def on_function_call_end(self, function_call, logs):
        self._update_plot()

    def _update_plot(self):
        self._update_parametrization_plot()
        self._update_traceback()
        self.__writer.grab_frame()

    def _update_parametrization_plot(self):
        title = self._render_parameters(self.__function.parameters)
        self.__ax1.set_title(title)
        self.__line.set_ydata(self.__function({"x": x_values}))

    def _update_traceback(self):
        for line in self.__par_lines:
            par_name = line.get_label()
            new_value = function.parameters[par_name]
            x = line.get_xdata()
            x = [*x, x[-1] + 1]
            y = [*line.get_ydata(), new_value]
            line.set_xdata(x)
            line.set_ydata(y)
        y_values = np.array([line.get_ydata() for line in self.__par_lines])
        self.__ax2.set_ylim(y_values.min() * 1.1, y_values.max() * 1.1)

    @staticmethod
    def _render_parameters(parameters):
        values = []
        for name, value in parameters.items():
            symbol = sp.Dummy(name)
            latex = sp.latex(symbol)
            values.append(f"{latex}={value:.2g}")
        return f'${",".join(values)}$'
from tensorwaves.estimator import ChiSquared
from tensorwaves.optimizer import Minuit2

estimator = ChiSquared(
    function,
    domain={"x": x_values},
    observed_values=y_values,
    backend="jax",
)
optimizer = Minuit2(
    callback=FitAnimation(data, function, x_values, "fit-animation.gif")
)
fit_result = optimizer.optimize(estimator, initial_parameters)
fit_result
FitResult(
 minimum_valid=True,
 execution_time=29.94260025024414,
 function_calls=138,
 estimator_value=893.0064312499297,
 parameter_values={
  'n': 57.54724448914271,
  'mu': 24.662448814403568,
  'sigma': 4.824113861013821,
 },
 parameter_errors={
  'n': 0.24667422567274283,
  'mu': 0.023967859330352146,
  'sigma': 0.02377740957303412,
 },
)
Tip
This example uses ChiSquared as estimator, because this works nicely with binned data (see also Binned fit and Chi-squared estimator). For other estimator examples, see Unbinned fit, Core ideas illustrated, and Amplitude analysis.
Computational backends#
TensorWaves uses sympy’s Printing mechanisms to formulate symbolic expressions as a function in a computational backend like NumPy, JAX, and TensorFlow.
import sympy as sp

x, y, a, b = sp.symbols("x y a b")
expression = x**3 + sp.sin(y / 5) ** 2
expression
from tensorwaves.function.sympy import create_function

numpy_function = create_function(expression, backend="numpy")
tf_function = create_function(expression, backend="tensorflow")
jax_function = create_function(expression, backend="jax", use_cse=False)
Show code cell source
from tensorwaves.function import get_source_code

src = get_source_code(jax_function)
print(src)
def _lambdifygenerated(x, y):
    return x**3 + sin((1/5)*y)**2
These functions can be used to perform fast computations on large data samples:
import numpy as np

sample_size = 1_000_000
data = {
    "x": np.random.uniform(-50, +50, sample_size),
    "y": np.random.uniform(0.1, 2.0, sample_size),
}
%timeit -n3 numpy_function(data)
%timeit -n3 tf_function(data)
%timeit -n3 jax_function(data)
27.1 ms ± 436 µs per loop (mean ± std. dev. of 7 runs, 3 loops each)
83 ms ± 1.8 ms per loop (mean ± std. dev. of 7 runs, 3 loops each)
10.9 ms ± 3 ms per loop (mean ± std. dev. of 7 runs, 3 loops each)
As we saw above, such a computational function can be used to optimize parameters in a model. It can also be used to generate data or to create an interactive visualization of an expression!
Generate and transform data#
The data module comes with tools to generate hit-and-miss data samples for a given expression. In addition, instance of the DataTransformer interface allow transforming DataSamples to a different coordinate system. An example would be to describe a distribution in polar coordinates \((r, \phi)\):
import sympy as sp

r, phi, dphi, k_phi, k_r, sigma = sp.symbols(R"r phi \Delta\phi k_phi k_r sigma")
expression = (
    sp.exp(-r / sigma) * sp.sin(k_r * r) ** 2 * sp.cos(k_phi * (phi + dphi)) ** 2
)
expression
polar_function = create_parametrized_function(
    expression,
    parameters={dphi: 0, k_r: 0.6, k_phi: 2, sigma: 2.5},
    backend="jax",
)
While the expression is described in polar coordinates, the input data arrays could be measured in a cartesian coordinate system. The data arrays can be converted efficiently with a SympyDataTransformer:
cartesian_to_polar = {
    r: sp.sqrt(x**2 + y**2),
    phi: sp.Piecewise((0, sp.Eq(x, 0)), (sp.atan(y / x), True)),
}
Show code cell source
from IPython.display import Math


def display_definitions(definitions):
    for symbol, expr in definitions.items():
        latex = sp.multiline_latex(symbol, expr)
        display(Math(latex))


display_definitions(cartesian_to_polar)
from tensorwaves.data import SympyDataTransformer

converter = SympyDataTransformer.from_sympy(cartesian_to_polar, backend="numpy")
We can now generate a domain sample for the function as well as an intensity distribution based on that expression using the tensorwaves.data module. Again, we first express the mathematical expression a computational function.
We then define a domain generator and a hit-and-miss IntensityDistributionGenerator with which we can generate a data distribution in cartesian coordinates for this expression in polar coordinates.
from tensorwaves.data import (
    IntensityDistributionGenerator,
    NumpyDomainGenerator,
    NumpyUniformRNG,
)

rng = NumpyUniformRNG()
domain_generator = NumpyDomainGenerator(boundaries={"x": (-5, 5), "y": (-5, +5)})
data_generator = IntensityDistributionGenerator(
    domain_generator, polar_function, converter
)
cartesian_data = data_generator.generate(1_000_000, rng)
polar_data = converter(cartesian_data)
Show code cell source
from matplotlib import cm

fig, (ax1, ax2) = plt.subplots(ncols=2, figsize=(7, 4.3))
fig.canvas.toolbar_visible = False
fig.canvas.header_visible = False
fig.canvas.footer_visible = False
ax1.hist2d(*cartesian_data.values(), bins=100, cmap=cm.coolwarm)
ax2.hist2d(polar_data["phi"], polar_data["r"], bins=100, cmap=cm.coolwarm)
fig.suptitle("Hit-and-miss intensity distribution")
ax1.set_title("cartesian")
ax2.set_title("polar")
ax1.set_xlabel("$x$")
ax1.set_ylabel("$y$")
ax2.set_xlabel(R"$\phi$")
ax2.set_ylabel("$r$")
ax1.set_xticks([])
ax1.set_yticks([])
ax2.set_xticks([-np.pi / 2, 0, np.pi / 2])
ax2.set_yticks([])
ax2.set_xticklabels([r"$-\frac{\pi}{2}$", "0", r"$+\frac{\pi}{2}$"])
fig.tight_layout()
plt.show()
See also
We can also use the SympyDataTransformer to interactively visualize how this ParametrizedFunction behaves for different parameter values!
Show code cell source
%matplotlib widget
import ipywidgets
import matplotlib.pyplot as plt
import numpy as np
from matplotlib import cm

size = 200
X, Y = np.meshgrid(
    np.linspace(-5, +5, size),
    np.linspace(-5, +5, size),
)
cartesian_domain = {"x": X, "y": Y}
polar_domain = converter(cartesian_domain)

fig, ax_interactive = plt.subplots(figsize=(5, 5), tight_layout=True)
fig.canvas.toolbar_visible = False
fig.canvas.header_visible = False
fig.canvas.footer_visible = False
ax_interactive.set_xticks([])
ax_interactive.set_yticks([])
ax_interactive.set_xlabel("$x$")
ax_interactive.set_ylabel("$y$")
color_mesh = None


@ipywidgets.interact(
    dphi=ipywidgets.FloatSlider(value=0, min=0, max=np.pi, step=np.pi / 100),
    k_r=(0, 3.0, np.pi / 100),
    k_phi=(0, 6),
    sigma=(0.1, 5),
)
def plot(dphi, k_r, k_phi, sigma):
    global color_mesh, X, Y
    polar_function.update_parameters(
        {R"\Delta\phi": dphi, "k_r": k_r, "k_phi": k_phi, "sigma": sigma}
    )
    Z = polar_function(polar_domain)
    if color_mesh is not None:
        color_mesh.remove()
    color_mesh = ax_interactive.pcolormesh(X, Y, Z, cmap=cm.coolwarm)
Advanced examples#
The following pages show some more specific use cases of tensorwaves. See Amplitude analysis for how to use tensorwaves for Partial Wave Analysis.